3. Protect Mobile Devices
One of the dangers of mobile
device usage is that if a user loses the device, they lose control of
all the data on it. Exchange allows you to take many precautions to keep
this loss at a minimum. This section explores those protection
capabilities and shows you how to implement them.
3.1. Enforce Password Requirements
One of the simplest ways
to protect your mobile devices is through password requirements. Many
users will look on this protection mechanism as an annoyance, but it's
easy to implement and extremely effective.
By setting a
password requirement on your devices, you force the user to enter the
password after the device hasn't been used for a specified period of
time. You then determine how many failed password attempts you want to
allow. If the wrong password is entered more times than you allow, the
device is wiped clean, which destroys all the data that was stored on
the device.
The password requirements can be controlled at a granular level. The following password options are available:
Require both letters and numbers
Allow usage of a simple PIN number
Set minimum length of the password
Set number of days before a password expires and the user is forced to change it
Specify number of previous passwords that can't be used again
In addition to
setting requirements on how the password is composed, you can control
additional features related to security management and what happens when
the wrong password is entered. The following settings can be
configured:
Whether the password can be recovered if the user forgets it
Encryption requirements on the device and the storage card
The number of wrong passwords before the device is wiped
The number of minutes between uses of the device before the user must enter the password
The password settings are
enforced through the device policy.
3.1.1. Use the Exchange Management Console to Change Password Requirements
To change the password requirements in the EMC:
Open the EMC and browse to the Organization Configuration => Client Access node in the Console tree.
In the Work area, select the Exchange ActiveSync Mailbox Policies tab.
In the ActiveSync Mailbox Policies list, select the policy that you want to configure the password settings on.
After
selecting the policy that you want to modify, either double-click on it
or select the Properties option from the Actions pane on the right of
the EMC.
This will bring up the properties dialog box for the policy.
In the properties dialog box, click the Password tab.
The list of password options is displayed on this tab.
Select
the Require Password check box. This will turn on the password
requirement for devices using this policy. Check and uncheck the
appropriate boxes to configure the password rules for this device
policy.
After configuring the password options, click OK to make the changes.
3.1.2. Use the Exchange Management Shell to Change Password Requirements
If you use the EMS to configure
password options, you can configure some of the options more granularly
than in the EMC. For example, you can set a device to lock after 15
minutes and 30 seconds, instead of just 15 minutes. To set a password
policy in the EMS, you use the Set-ActiveSyncMailboxPolicy command. Table 3 shows the parameters to use with this command to set the various password options.
Table 3. Parameters for Mobile Device Password Requirements in the EMS
| Password Option | Command Parameter | Possible Values |
|---|
| Require Password | DevicePasswordEnabled | $true, $false |
| Require Alphanumeric Password | AlphaNumericDevicePasswordRequired | $true, $false |
| Minimum Number Of Complex Characters | MinDevicePasswordComplexCharacters | A number between 1 and 4 |
| Enable Password Recovery | PasswordRecoveryEnabled | $true, $false |
| Require Encryption On The Device | RequireDeviceEncryption | $true, $false |
| Require Encryption On Storage Card | RequireStorageCardEncryption | $true, $false |
| Allow Simple Password | AllowSimpleDevicePassword | $true, $false |
| Number Of Failed Attempts Allowed | MaxDevicePasswordFailedAttempts | Unlimited or a number between 4 and 16 |
| Minimum Password Length | MinDevicePasswordLength | $null to disable or a number between 1 and 16 |
| Time Without User Input Before Password Must Be Re-entered (In Minutes) | MaxInactivityTimeDeviceLock | Unlimited or a time value between 1 minute and 1 hour |
| Password Expiration (Days) | DevicePasswordExpiration | Unlimited or a time value between 1 and 730 days |
| Enforce Password History (Prevent The User From Repeating Passwords Used Previously) | DevicePasswordHistory | A number between 0 and 50 |
For time values, the format is entered as dd.hh:mm:ss (days.hours:minutes:seconds). For example, if you want to use 15 minutes and 30 seconds as the time value, that would be represented as 00.00:15:30.
The following example command
turns on the password requirement and sets the password to expire in 90
days, 4 hours, 10 minutes, and 13 seconds:
Set-ActiveSyncMailboxPolicy "Executive Policy"
-DevicePasswordEnabled $true
-DevicePasswordExpiration 90.04:10:13
3.2. Recover the Password for a Device
If users are required to set
passwords on their devices, the potential exists for them to forget
their passwords. Therefore, Exchange gives you the ability to recover
their device password for them. If you enable password recovery for
mobile devices, a secondary password is generated and stored in
Exchange. An administrator can gain access to this password via the
steps in this section. A user can also access their secondary password
themselves using the ECP in OWA.
|
If the user forgets their
password, they can enter password recovery mode on their mobile device
and establish a new password. To enter recovery mode on a Windows Mobile
device, the user should select the Menu => Reset Password option from the device.
|
|
To access the recovery password via the EMC:
Open the EMC and browse to the Recipient Configuration => Mailbox node.
In the list of mailboxes displayed in the Results pane, select the mailbox of the user that you want the recovery password for.
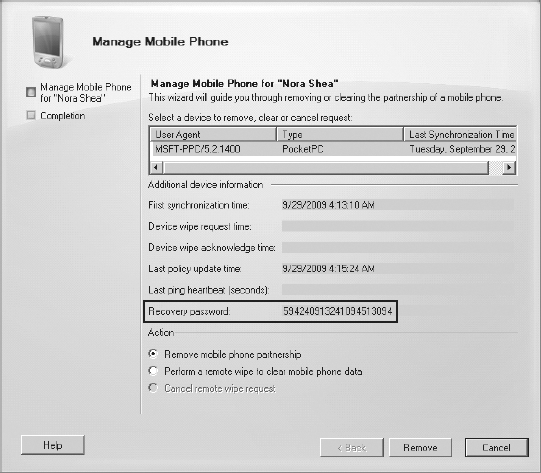
In the Actions pane, click the Manage Mobile Phone option.
In the Manage Mobile Device dialog box, the recovery password is displayed in the Recovery Password field, as shown in Figure 2. Give this password to the user and instruct them to enter it in the Recovery Password field on their device.
The recovery password can also be accessed through the EMS using the Get-ActiveSyncDeviceStatistics command. You must specify the ShowRecoveryPassword
parameter in order for the password to be displayed. Users can have
multiple devices, so it is useful to also display the phone number of
the device so you know what device the recovery password belongs to. The
following command can be used to get the recovery password for a
device. It lists the phone numbers and recovery passwords for all the
devices associated with the John Smith mailbox.
Get-ActiveSyncDeviceStatistics -Mailbox "John Smith"
-ShowRecoveryPassword | fl DevicePhoneNumber,
RecoveryPassword
3.3. Control Application Usage
When a user has physical
control over their device, they can install any application that they
want to run. Because of this, the possibility exists for malicious or
inappropriate applications to be used. As the Exchange administrator,
you can control application usage on the mobile device by blocking
certain applications.
You can disable applications and application installers that are not signed by the developer as well as specific applications.
3.3.1. Use the Exchange Management Console to Disable Mobile Device Applications
To disable unsigned applications and installation packages in the EMC:
Open the EMC and browse to the Organization Configuration => Client Access node.
Select
the policy that you want to restrict unsigned applications for and
either double-click it or click the Properties option in the Actions
pane.
In the properties dialog box for the policy, click the Device Applications tab.
Uncheck the options Allow Unsigned Applications and Allow Unsigned Installation Packages.
Click OK to make the changes to the policy.
|
When using some of the
features discussed in this section, you may find that they don't
consistently work across all devices. In order for a device to apply
features such as blocking application usage, the mobile operator must
provision the mobile device with the Enterprise security role. If this
didn't happen, you can make the changes yourself with a custom CAB file.
Follow these steps:
Paste the following text into a blank file with Notepad and save the file as _setup.xml: <wap-provisioningdoc>
<characteristic type="SecurityPolicy">
<!--Grant Enterprise Policy:-->
<parm name="4119" value="252" />
</characteristic>
</wap-provisioningdoc>
Then make this XML file into a CAB file by performing the steps at the following website: http://technet.microsoft.com/en-us/library/cc182267.aspx
Install the CAB file on the mobile devices, re-sync the mail, and perform a soft reset of the device.
|
To block specific applications by name in the EMC:
Open the EMC and browse to the Organization Configuration => Client Access node.
Select
the policy that you want to block applications on and either
double-click it or click the Properties option in the Actions pane.
In the properties dialog box for the policy, click the Other tab.
In the Block Applications list, click the Add button to add a blocked application.
A dialog box will be displayed that asks for the application name.
In the Add Blocked Application dialog box, enter the filename of the application that you are blocking and click OK.
For example, if you are blocking Google Maps, enter
GoogleMaps.exe
.
Click OK to close the properties dialog box and make the changes to the policy.
3.3.2. Use the Exchange Management Shell to Disable Mobile Device Applications
Applications can be
restricted and blocked using the EMS as well. To disallow unsigned
applications and block specific applications, you use the Set-ActiveSyncMailboxPolicy command. For disabling unsigned applications, use the AllowUnsignedApplications and the AllowUnsignedInstallationPackagesUnapprovedInROMApplicationList parameter. parameters. For blocking a specific application, use the
The following command disables unsigned applications and blocks Google Maps from running on the device:
Set-ActiveSyncMailboxPolicy "Executive Policy"
-AllowUnsignedApplications $false
-AllowUnsignedInstallationPackages $false
-UnapprovedInROMApplicationList GoogleMaps.exe
3.4. Remotely Wipe a Device
If a mobile device is stolen
or missing, the owner's email, contacts, and other personal data can be
in the hands of the wrong person. Therefore, for mobile devices, you
can wipe a device remotely (over the Internet) to ensure that the data
is cleaned off it. This doesn't aid in the recovery of the physical
device, but it does help protect the data that was on it. You can
remotely wipe a device and any storage cards attached to it through
either the EMC or the EMS.
|
Remotely wiping a device not
only deletes the data on the device, but also deletes all of the data
on the storage cards in the device. If you are testing this
functionality on your own phone, you may want to remove the storage card
beforehand to prevent losing your data.
|
|
3.4.1. Use the Exchange Management Console to Remotely Wipe a Mobile Device
To remotely wipe a device in the EMC:
Open the EMC and browse to Recipient Configuration => Mailbox in the Console tree.
In the Results pane, select the user whose device you want to wipe from the list of recipients.
Select the option Manage Mobile Phone from the Actions pane.
If the Manage Mobile Phone option doesn't appear, that means the user does not have any mobile devices.
In the Manage Mobile Device wizard, select the device that you want to wipe from the device list.
Click the option Perform A Remote Wipe To Clear Mobile Phone Data.
Click
the Clear button. You will be prompted with a dialog box asking whether
you are sure that you want to clear the device. Click the Yes button to
proceed.
In the Completion screen, click the Finish button to close the wizard.
3.4.2. Use the Exchange Management Shell to Remotely Wipe a Mobile Device
You can also wipe a device using the EMS:
Open the Exchange Management Shell.
Get a list of devices for a user and determine which device you want to wipe. To retrieve a list of devices, use the Get-ActiveSyncDeviceStatistics command.
The following example lists the Identity parameters of all devices associated with the Nora Shea mailbox:
Get-ActiveSyncDeviceStatistics -Mailbox "Nora Shea" |
fl Identity
You will need the Identity parameter acquired in Step 2 to perform the wipe. Run the Clear-ActiveSyncDevice command and specify the device's identity:
Clear-ActiveSyncDevice -Identity [DeviceIdentity]
When wiping the device using
the EMS, you can also opt to send the owner a notification email
indicating that the device was wiped. To do this, specify the NotificationEmailAddresses parameter with the Clear-ActiveSyncDevice command.
Sometimes the device
identity parameter can be long and arduous to enter. Using the EMS,
however, there are ways to pipeline the command so you don't need to
re-enter the device identity. The following EMS command will clear the
device associated with the John Smith mailbox that has a phone number ending with 1234 and will email a notification to [email protected]:
Get-ActiveSyncDeviceStatistics -Mailbox "John Smith" |
where {$_.DevicePhoneNumber -like '*1234'} |
Clear-ActiveSyncDevice -NotificationEmailAddresses
"[email protected]"